Friday, August 31, 2012

Peach Pecan Galette

A couple of winters ago I made a very delicious Cranberry Walnut Crostata from a recipe by Marcel Desaulniers by way of Rose Levy Berenbaum in her Pie and Pastry Bible. I loved the dough because it was the first time I worked with a nut pastry without having to struggle to roll it out. It has just the right ratio of ingredients to make it supple and easy to handle.

When I bought what will likely be some of the last gorgeous peaches of the summer, I thought it would be fun to try that dough again. And since peaches often seem to evoke the south as do pecans, I decided to switch out the walnuts in the pastry dough for pecans.

If you're lucky enough to possess some juicy sunset glow peaches, you may want to celebrate them in simple style with this rustic galette. It's pretty easy to make and even easier to enjoy. Not too sweet, not too rich - just right for a light and delicious close to an end-of-summer soiree.


Bench notes:
- Lightly toast the pecans in a 350 degree oven for about 8 - 10 minutes or until they just start to give off a light toasty aroma.
- The pastry dough has less sugar and less butter to make it less fragile. The pecans in the pastry dough should be finely ground with the flour to making handling and rolling out the dough effortless.
- Berenbaum advises against substituting almonds (too hard) or pistachios (too soft) for the nuts in the dough.
- You don't need a lot of extra flour to roll out the pastry, just enough so it isn't sticking to the rolling pin or the parchment. Use a pastry brush to dust off any excess flour remaining on the surface of the pastry before you add the fruit.

Peach Pecan Galette
pastry dough adapted from Desserts to Die For by Marcel Desaulniers and Pie and Pastry Bible by Rose Levy Berenbaum
Serves 6 - 8

1/2 C (about 2 oz) pecans, toasted
1 T + 1 t sugar, divided
pinch of cinnamon
1 C flour
1/4 t salt
2 oz (4 T) cold butter, cut into pieces
1 egg yolk
3 T ice water

2 large or 3 medium fresh peaches
2 1/2 T granulated or brown sugar
1 T flour

Egg wash
1 egg
1 T water
few grains of salt

Subtract 2 tablespoons of pecans from the 1/2 cup. Chop them into small pieces and combine with the 1 tablespoon of sugar and a pinch of cinnamon. Set aside as a garnish to sprinkle on top of the edges of the formed pastry just before baking.

For the pastry, place the flour, 1 teaspoon of sugar and remaining pecans in the bowl of a food processor. Process until the nuts are finely ground into the flour mixture. Add the cold butter pieces and pulse until the texture looks like coarse meal with a few larger pieces of butter. Whisk together egg yolk and ice water. Add to dough mixture and pulse until dough begins to come together in clumps and there are no dry flour patches.

Turn the dough out onto a piece of plastic, bring it all together and form into a disc. Wrap tightly and chill for 30 minutes or until firm enough to roll.

When ready to assemble, preheat oven to 375 degrees.

Place the dough on a piece of parchment paper lightly dusted with flour. Roll into a 14" circle, using a light dusting of flour as you go to prevent sticking. Slide the rolled dough and the parchment paper onto a baking sheet or pizza pan. Chill while you prepare the filling.

Cut the peaches into wedges and toss with the sugar and flour until all the pieces are evenly coated. Arrange them on the dough leaving a 1 3/4 " border around the edge. Fold the border of dough over the filling, tucking and pleating in places where needed. Refrigerate until your oven is ready.

For the egg wash, whisk together the egg, water and salt until fully blended. Brush the border of pastry lightly with egg wash (you only need a bit) and sprinkle with the reserved 2 tablespoons of chopped pecans and sugar/cinnamon mixture.

Bake for 28 - 30 minutes or until the pastry is golden brown and the filling is bubbling. Cool for at least 15 minutes on a wire rack.


Friday, August 24, 2012

Plum & Kiwi Pavlova


If you've been making ice cream or custard, you likely have a stash of egg whites in your refrigerator. One easy way to use them up is to make a Pavlova, a light cloud of meringue typically topped with whipped cream, fresh strawberries, passion fruit and kiwi.

Feel free to create your own favorite fruit combination. I like to pair pavlova with tart fruit, the sharp acidity balancing the sweetness of the crispy meringue and the luxuriousness of whipped cream. Here I use fresh plums because they were calling out to me at the market and because I love them. And I like the bright color of dark purple plums and bright green kiwi against the stark white base.

The pavlova dries out in a low and slow oven to the produce the right texture. I've simmered the plums a bit to soften them and bring out their juices but that may not be necessary if you have very ripe plums at the ready.

Enjoy an end-of-summer fruit pavlova as we transition into a glorious fall season!

A note of gratitude: This week marks my 5th year of blogging! I want to thank all my incredible readers for your support. Thank you for sharing your own special brand of creativity here in the comments and on your own blogs, which makes it so much more fun and interesting. Let's dedicate ourselves to finding lots more inspiration in the year ahead!


Bench notes:
- Egg whites are easiest to separate when cold but achieve their best volume when they have warmed to room temperature.
-Fat is the enemy of meringue. Be sure your mixing bowl and whisk are clean, dry and free of any fat (no traces of egg yolk, butter, oil, nuts or chocolate present). If there is even a speck of fat, your egg whites will refuse to cooperate!
- Most recipes for meringue include salt and/or an acid. A pinch of salt helps to firm up the egg protein. An acid, such as cream of tartar, lemon juice or vinegar, stabilizes the meringue by preventing the air bubbles from bursting once you stop beating. Cream of tartar is an acid salt.
- If you have any leftover meringue, make some additional smaller discs for individual meringues or pipe small dollops for cookies to sandwich with jam or chocolate ganache. Just pipe them on a separate baking sheet and remove them after about an hour or so. Unfilled, they'll keep in an airtight conatiner for about a week if you're not in a very humid environment.

Plum & Kiwi Pavlova
Makes about 8 servings

3 egg whites @ room temperature
3/4 C sugar
1/4 t cream of tartar

3/4 C heavy cream, chilled
2 t sugar
1/4 t vanilla

1 - 2 kiwi
3 black or Santa Rosa plums
1/2 C water (optional)
3 T sugar (optional)
1/4 vanilla bean (optional)

Preheat oven to 200 degrees. Line a baking sheet with parchment.

Place the egg whites in the bowl of an electric mixer and whisk on medium low speed. Add cream of tartar when they are foamy. Increase speed to medium high and continue whisking until they are opaque. Slowly add sugar a couple of tablespoons at a time and continue whipping until meringue forms very stiff shiny peaks that hold their shape.

Drop meringue by spoonfuls onto the parchment-lined baking sheet. Spread it out to a 9" - 10" round, using a light tough and letting it take its own cloud-like form with a slight indentation in the center area.

Place in the oven and bake for about 1 1/2 - 2 hours or until meringue is dry and easily releases from the parchment. Turn off the oven and let it dry for another 1/2 hour, then remove to a wire rack and cool completely.

When ready to serve, slice plums into wedges and peel and slice kiwi. Whip the cream with the sugar and vanilla just until it forms soft peaks. Place the disc of meringue on a serving platter. Spread the cream across the disc and distribute the kiwi and the plums. Serve immediately.

If you'd like your plums softened a bit, bring water, sugar and vanilla bean to a slow boil for about 2 - 3 minutes until sugar is dissolved. Lower heat and add plums. Gently simmer for 3 - 5 minutes until fruit is tender. Remove from heat and cool before serving.

Friday, August 17, 2012

Buttermilk Biscuits


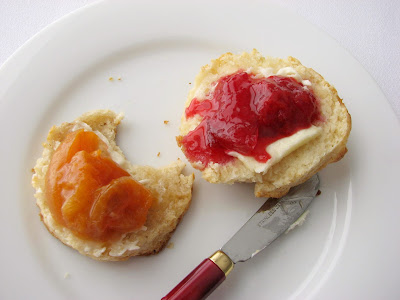
You're probably wondering what Buttermilk Biscuits have to do with the Kingdom of Pastry. Well, in pastry school, you also have to learn how to make breads, crackers and biscuits as well as cake, custards, tarts, cookies, ice cream, confections, jams and a lot of other assorted pastries. So when I was thinking about making something to go with my fresh fruit compotes of the season, I decided to whip up a batch of simple biscuits.

This is a baking powder biscuit that can be on your table in the amount of time it takes for your oven to heat up. I like the rich tang of buttermilk, so it's the star in this particular version. The biscuits are hearty with a crisp crust and an interior that is tender and buttery. And, of course, rather than honey or preserves, these biscuits would make excellent bacon and egg sandwiches or a perfect vehicle for your favorite gravy. This is an occasional indulgence for those lazy weekends when you'd like something a little more soul-soothing. Go for it!


Bench notes:
- There are just a few things to remember when mixing biscuit dough. 1) Both the buttermilk and the butter must be very cold to produce a flaky biscuit. The colder the butter, the less likely it will be absorbed by the flour, which means as it bakes off that separation will form nice flaky layers. Dice the butter and put it in the freezer while you prepare the other ingredients. 2) Once you add the cold butter, work fast to incorporate it into the flour so that it stays cold. You can use a pastry blender or your hands to get the butter reduced down to pea-sized pieces. 3) When you add the buttermilk, use a fork to stir it together. It shouldn't take more than 10 or so rounds of stirring. The dough will look lumpy. 4) Lightly dust your work surface and your hands with flour. Pour the biscuit mix onto the work surface and pull the dough together with about 3 - 4 very light kneads. You don't want to overwork the dough but you also don't want a pile of clumps. So be gentle and you'll see it come together very quickly. 5) Pat the dough to form a round that's about 1 1/4" thick. Use a 2 1/2" cutter and press down to form the biscuits and lift straight up when you're done. To prevent sealing the edges and to preserve the flakiness of the biscuit, no twisting or turning the cutter.
- My oven runs a bit hot, so my biscuits baked in 11 minutes. Start checking about that time. The bottoms should be crisp and a rich golden brown.
- There are all kinds of theories about using part cake flour. I prefer straight all-purpose flour but if you'd like to experiment for biscuits that are less sturdy and more tender, you can easily find a recipe that will do the trick.
- Add your favorite chopped herbs or chives to the dry ingredients. I like freshly ground black pepper.
- For something more in the realm of pastry, try Cream Scones. They are perfect for the traditional whipped cream, jam and tea. Or another pastry in the biscuit family is shortcake. Some of my variations are Cinnamon Pecan Biscuits with Peaches and Cream, Oatmeal Shortcake with Plums, Blue Cheese Walnut Biscuits with Pear Compote and Cream, Cornmeal Shortcake with Peaches and Gingerbread Shortcake with Pears.
- This is a really great Apricot Compote made with vanilla, honey and cinnamon.


Buttermilk Biscuits
Makes about 8 - 10 biscuits

2 C flour
1 T baking powder
1 t salt
1 t sugar
1/4 t baking soda
4 oz (8 T) cold butter, cut into small pieces
1 C cold buttermilk

1 T melted butter for brushing on the tops

Preheat oven to 425 degrees F. Prepare a baking sheet with parchment or a silpat.

Sift the flour, baking powder, salt, sugar and baking soda together in a bowl. Add the small pieces of cold butter and, using your hands, toss to coat all the pieces of butter with flour. Working quickly with a pastry blender or your fingers, pinch and flatten the butter into the dry ingredients until the mixture looks like pebbles the size of peas with some smaller crumbs.

Make a well in the middle of the flour mixture and pour the cold buttermilk into the well. Using a fork, fluff the flour into the center and gently stir and turn the ingredients until you have a soft dough.

Lightly dust the work surface and your hands with flour and turn out the dough. Give it a gentle kneading; about 3 - 4 turns should be enough to consolidate the dough. Pat it into a round about 1 1/4" thick. Use a 2 1/2" cutter to form the biscuits, pushing straight down and lifting up to cut rather than twisting. Place the biscuits on the prepared baking sheet. Gather the scraps and stack them. Gently press and pat them into a piece about 1 1/4" thick and cut out additional biscuits.

Brush the tops lightly with melted butter. Bake the biscuits for 11 - 14 minutes or until they are puffed and the bottoms are golden brown. Serve warm.

Friday, August 10, 2012

Oat Crisps


It's been a while since I've returned to my old favorite standby, oatmeal. As ingredients go, I consider oats so reliably simple and delicious that is just seems like a natural to keep them top shelf in my pastry pantry. So when I was ruffling through stacks of collected recipes, I instantly gravitated to this Oat Crisps cookie from Emily Luchetti. It's not often that you see a recipe that contains just 5 ingredients. And when it's a recipe that includes oatmeal, it triggers an automatic positive response from me. One thing I did add to the recipe that I felt was the missing 6th crucial ingredient - salt. I think it's important to balance the sweetness and enhance the oatmeal and I like the contrasting sensation of salty caramel.

This is a very crisp, very thin brittle cookie that is definitely a showcase for the heavenly pairing of oatmeal and brown sugar. The edges brown and remind me of burnt caramel, in a good way. And since these 5 ingredients get mixed in a saucepan, it couldn't be any easier to work up a batch. As it turns out, it's about a 20 minute project from start to finish. Then all that's left is settling in with a good cup of coffee and a bite or two of crispy toasted oat goodness.

Bench notes:
- Emily Lucchetti's recipe serves these cookies with 4 cups of blueberries and 1 cup of creme fraiche for 6 portions. Plain yogurt would probably also be very good.
- Baking time in the recipe is listed as 15 minutes but mine were done in 10. Check around the 8 minute mark to see how they're doing and get a feel for how your oven wants to bake them. With these types of thin cookies and tuiles, it's really easy to go from perfect to burnt in just an extra minute.
- I lined the baking sheet with silpats and let them cool completely on the baking sheet. Then I used my beloved small offset spatula to lift them off the pan. Ask any pastry chef, this is one of the tools we'd take to the desert island.
- This would be a good cookie served alongside ice cream or crumbled as a garnish.


Oat Crisps
Makes about 22 cookies

1 1/4 oz (2 1/2 T) butter, melted
1/4 C dark brown sugar, firmly packed
2 T granulated sugar
2 T dark corn syrup
1/8 t salt [my addition]
1 C old fashioned rolled oats

Preheat oven to 350 degrees. Line 2 baking sheets with parchment paper or silpats.

Melt the butter and take off the heat. Add brown sugar, granulated sugar and corn syrup and whisk until blended. Using a spoon, stir in the oats and mix until they are all coated with the butter and sugar mixture.

Drop the cookie dough by tablespoonfuls onto prepared baking sheets, spacing them 2 1/2" apart. Bake, rotating the baking sheets at midway point, until golden brown and bubbly, about 10 - 15 minutes. Cool on the pan. Use a metal spatula to lift them off. Store in an airtight container at room temperature.


Friday, August 3, 2012

Goat Cheese Ice Cream with Cherries


I once worked with a cheesemonger and thoroughly loved the experience of learning about and tasting lots of different cheeses. The sights and smells of those packages arriving from all over the world each week provided great pleasure. Cheese made from goat's milk quickly became among my favorites. Goat cheese is lighter in fat and I love the pronounced tang and the unmistakable texture.

Having some extra goat cheese and cream cheese in my refrigerator prompted the making of this ice cream. It's a recipe from Jeni's Splendid Ice Cream, an ice cream shop that began in Ohio and has expanded into an extensive empire due to the popularity of their innovative ice creams. Goat Cheese with Red Cherries is one of their perennial flavors so I thought I'd give it a try to use up my spare goat cheese and cream cheese.

I also wanted to test Jeni's unique formulation. Her basic recipe for all her ice creams includes cream cheese, cornstarch and corn syrup. While I rarely use corn syrup for anything and only in very small quantities, it is sometimes used in ice cream to improve the viscosity and prevent ice crystal formation. Cornstarch is a standard thickener in Sicilian gelato. Cream cheese is an unusual addition but since Jeni doesn't use egg yolks, this replaces some of the fat and richness associated with conventional custard-based ice cream.

The Goat Cheese Ice Cream is described in the cookbook as tasting like cheesecake and I can vouch for that. While not quite as dense as cheesecake, it's rich, creamy and definitely has the delicious taste of cheese. It's a beautiful white color and would pair well with acidic fruit and fruit sauces to foil the richness as well as toasted or candied nuts for a texture contrast.

Sometime soon I'll have to test more of Jeni's recipes that aren't based on cheese so that I can get a better feel for her method and how it affects the texture of her ice cream. There are lots of intriguing choices in her beautiful book, so that shouldn't be any problem at all.

Bench notes:
- When bringing the milk, cream, sugar and corn syrup to a boil, keep a close eye on it. Cream has a tendency to boil over and make a spectacular mess!
- Fresh goat cheese, also known as chevre, is the soft crumbly kind.
- It's easier to combine the goat cheese and the cream cheese if both are at room temperature.
- Jeni instructs to chill the base in a plastic bag submerged in an ice bath. My habit is to chill ice cream mixes in the refrigerator overnight. I find this ensures that the base is really cold enough to make efficient use of the ice cream machine and it allows the flavors to settle in and marry.
- Jeni has a recipe for Roasted Cherries that she recommends for this ice cream. I had some balsamic cherries on hand so I used them instead. The sugar level in her recipe seems awfully high but that may be due to the fact that she mixes the cherries into the ice cream.
- If you enjoy goat cheese, try this terrific Goat Cheese Cake. It's light, bright, fresh and absolutely delectable.
- Thanks to my readers who requested more information, I'm starting a new gluten free category of recipes. I'll be working on it over the weekend to include all my past recipes that don't contain gluten. Hope it helps those who are searching for gluten free pastries and desserts.


Goat Cheese Ice Cream
Makes 1 generous quart

2 C milk
1 T + 1 t cornstarch
1/2 C (4 oz) fresh goat cheese
1 1/2 oz (3 T) cream cheese, softened
1 1/4 C heavy cream
2/3 C sugar
1/4 C light corn syrup
1/4 t salt

Make a slurry by mixing 2 tablespoons milk with the cornstarch in a small bowl. Set aside.

Whisk together the goat cheese and cream cheese until smooth.

Combine remaining milk, cream, sugar, corn syrup and salt in a 4-quart saucepan. Bring to a rolling boil over medium hight heat. Lower the heat to a slow boil for 4 minutes, stirring occasionally. Remove from heat and slowly whisk in the cornstarch slurry. Return to heat and bring the mixture back to a boil. Cook for 1 minute, stirring with a heat-proof rubber spatula. The mixture will be slightly thickened. Remove from heat.

Whisk the hot milk mixture into the cheeses until smooth. Pour into a clean airtight container and chill for several hours or overnight.

Freeze in your ice cream machine according to manufacturer's instructions. Pour into a clean container, press a piece of plastic wrap into the surface and seal with an airtight lid. Place in your freezer to firm up.