Showing posts with label chocolate. Show all posts

Friday, January 1, 2016

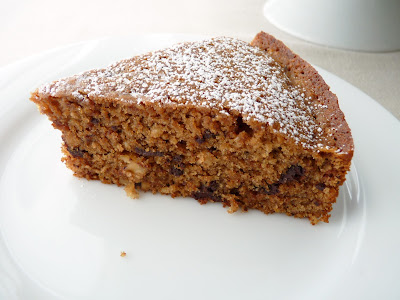
Walnut Tweed Cake


We all encounter both challenges and joys in our lives and this year was no different.  As hopeful humans, we commit to doing what it takes to stay positive and enjoy the gifts each day brings. Among the New Year's good luck traditions of eating greens (for the prosperity of folded money), legumes (resembling coins) and noodles (for long life) are round or ring-shaped cakes for a sweet full circle, the cycle of life.  In some cultures, the first piece is made as an offering to a saint and subsequent slices are served in order of age.  Sometimes there's a small token hidden for extra good luck to the finder.  So today I'm offering you a round cake in the hope you may enjoy a lovely year full of goodness and light and the very best of good luck in 2016.

As we turn the page into the 2016 winter season, I’m drawn to the fabulous trio of nuts, spice and chocolate.  And although I tend to go with almonds and pecans most of the time, I do love toasted walnuts in pastries and desserts.  California just happens to produce about 99% of the nation’s walnuts so they're readily available here.  Rich in plant-based omega-3, walnuts have a unique flavor all their own.  In this Walnut Tweed Cake, I combine toasted walnuts with the complimentary flavors of instant espresso powder, cardamom and chopped chocolate.  The cake is fairly light and subtle rather than rich or heavy.

When slicing into this simple rustic cake, it reminded me of the look of a warm fall tweed, just the sort of thing to ward off the chill of winter.  It has woven into its texture the comforting elements of simple and pure ingredients.  I do recommend as the winter seeps into our bones that you enjoy a nice slice with a good cup of hot coffee whenver the mood strikes for a cherished moment of life's luxury.   

Here’s wishing everyone a very HAPPY NEW YEAR!!

Bench notes:
-  Toasting walnuts brings out their full flavor and adds significantly to the cake.  Put the nuts in a single layer on a baking sheet in a 350 degree F oven for 10 - 15 minutes.  Cool.
- Room temperature butter is not oily or soft.  It should give just a bit when you press into the surface.
- Add the espresso powder to the milk and vanilla when the milk has warmed up to room temperature so it will more easily dissolve.
- Because there is a small amount each of flour and ground nuts, it’s important to take the time cream the butter and sugars properly on medium speed until light and fluffy; add eggs one at a time, mixing thoroughly before adding the next (the batter is ready for the next egg when it no longer has a shiny slick on the surface); and then thoroughly combining with the flour and nut mixture to build a solid structure.  Scraping down the bowl at each juncture really makes a difference.
- Chop the chocolate and remaining walnuts into fairly small pieces (about the size of chocolate chips) so they don’t sink to the bottom.
- For another seasonal walnut cake, try Walnut Maple Cake.


Walnut Tweed Cake
Serves 8

1 cup (4 oz) toasted walnuts, divided
3/4 cup (3 3/4 oz) flour
1 teaspoon baking powder
1/2 teaspoon salt
3/4 teaspoon ground cardamom
1/4 cup (2 oz) milk @ room temperature
1 teaspoon vanilla
1/2 teaspoon instant espresso powder
2 oz (1/3 cup) bittersweet or semisweet chocolate
4 oz (8 tablespoons) butter @ room temperature
1/2 cup (3 1/2 oz) granulated sugar
1/4 cup (1 3/4 oz) dark brown sugar, packed
2 eggs @ room temperature
1 egg yolk
powdered sugar, for dusting

Preheat oven to 350 degrees F.  Lightly grease and flour an 8” x 2” round cake pan and line the bottom with a round of parchment paper.

Place 3/4 cup (3 oz) toasted walnuts, flour, baking powder, salt and cardamom in the bowl of a food processor.  Process until the walnuts are finely ground.  Pour into a bowl and set aside.

Whisk together the milk, vanilla and instant espresso powder and set aside.

Coarsely chop the remaining 1/4 cup (1 oz) walnuts and chocolate into small pieces and set aside.

Cream the butter and both sugars until pale and fluffy, about 4 minutes.  Add eggs and egg yolk one at a time, fully incorporating each into the mixture before adding the next and stopping to thoroughly scrape down the bowl after each addition.

Slowly add the flour in three additions, alternating with the half the milk mixture and beginning and ending with the flour.  Mix until the batter is completely combined.  Use a rubber spatula to fold in the remaining 1/4 cup chopped nuts and chocolate.  Pour the cake batter into the prepared pan and spread it evenly.

Bake until a tester comes out clean, about 32 - 33 minutes.  Let the cake rest for 10 minutes. Gently run a thin bladed knife around the edge of the pan and invert the cake. Remove the parchment and invert the cake again.  Cool completely.  Dust with powdered sugar.

Friday, December 18, 2015

Chocolate Cinnamon & Hazelnut Thumbprints


If we're talking about the pairing of chocolate and nuts, it’s no secret that my favorite is the magical gianduia, Italian for the luxurious marriage of chocolate and hazelnuts.  Although I do love all the combinations, there’s something about the unique quality of toasted hazelnuts that pairs particularly beautifully with dark chocolate. 

For me, these Chocolate Cinnamon & Hazelnut Thumbprint cookies are the mother lode of the fabulous wonder of chocolate, cinnamon, vanilla and hazelnuts. There is superb deep cocoa, vanilla and cinnamon flavors co-mingling and a wonderful counterpoint of different textures.  There's a decent level of sugar that isn't too sweet or cloying and a dollop of chocolate that adds to the luxury.  The cookies are crispy on the outside, tender and chewy on the inside, a wealth of pleasure.  Perfect for the holidays, although I wouldn’t even consider filing this recipe away once December is in our rear view mirror.  These cookies are meant to be enjoyed throughout the year, whenever you feel like delighting your palate and treating yourself to something pretty sublime.  

My cookies didn’t come out nearly as beautiful as the Epicurious photo because I somehow forgot to roll the cookies in the cinnamon sugar before baking.  But I did try to remedy that just a wee bit by rolling them in the sugar before filling with chocolate to get the right sensation of flavor.  Please do make a point to remember to roll in the sugar because all of the garnishes - the sugar, cinnamon, chocolate and finely chopped hazelnuts - each in their own way contribute magically and significantly to the final product.

If you’re a lover of the combination of chocolate and hazelnuts like me, don’t hesistate to make this cookie.  It’s not difficult and the reward is the stuff of cookie dreams.  By which I mean, heaven.

Here’s to your happy season of baking!


Bench notes:
- Toasting nuts brings out the oil and heightens their flavor. Toast hazelnuts in a 350 degree F oven for about 7 - 8 minutes.  Watch them closely as they will taste bitter if they are left too long.  Remove from the oven and wrap the nuts in a kitchen towel and let them steam for about 1 minute.  Rub them in the towel to remove any loose skins (don't worry about the bits of skin still clinging) and let cool.
- Use natural cocoa powder, not dutched.
- 1 tablespoon may seem like a ton of vanilla but it is perfect!
- The original instructions call for mixing in the conventional way: creaming butter and sugar, adding the egg, then the dries.  I decided to mix mine in a food processor, so this is my method:  Place 1/2 cup hazelnuts, flour, cocoa, baking soda, salt, 1 1/4 teaspoons cinnamon and sugar in the bowl of a food processor and process until the nuts are finely ground.  Cut 8 oz cold butter into 1/2” pieces and add to the bowl.  Process until the butter is well incorporated.  Add the egg and vanilla and process until the mixture forms clumps around the center of the machine and holds together when pinched.
- I use a #40 ice cream scoop to portion the cookie dough.
- After baking, I use the small end of a melon baller to create the wells.  Rather than pushing straight down into the warm cookies, I pressed down gently, rocking the utensil back and forth to prevent the warm cookies from cracking excessively.
- The recipe calls for semisweet (62%) for the chocolate garnish but I used bittersweet (72%).  I just used a teaspoon to drizzle the chocolate into the wells of each cookie.
- Cookies can be stored in an airtight container at room temperature for about 1 week.
- There’s a how-to video of the recipe available from Epicurious.


Chocolate Cinnamon & Hazelnut Thumbprints
adapted from Epicurious
Makes about 2 1/2 dozen cookies

Cookie Dough
1/2 cup (2.5 oz) toasted hazelnuts   
2 cups (10 oz) flour                                                
1/2 cup (1 1/2 oz) cocoa powder                         
1/2 teaspoon baking soda                                                           
1/2 teaspoon salt                                                   
1 1/4 teaspoons cinnamon                    
8 oz (16 tablespoons) unsalted butter @ room temperature
1 cup (7 oz) sugar                                                  
1 large egg                                                                                                                          
1 tablespoon vanilla                                              

Sugar Garnish
1/2 cup sugar                              
1 teaspoon cinnamon

Finishing Garnish
2 tablespoons (3/4 oz) toasted hazelnuts
4 oz (about 2/3 cup) semisweet chocolate  [I used bittersweet]
2 oz (4 tablespoons) unsalted butter

Grind 1/2 cup hazelnuts until finely ground.  Transfer to a large bowl.  Add flour, cocoa powder, baking soda, salt, and 1 1/4 teaspoons cinnamon and whisk until thoroughly combined.

Beat 8 oz butter and 1 cup sugar until pale and fluffy, about 2 – 3 minutes.  Add the egg and vanilla and beat until thoroughly blended.  Reduce to low speed and add the dry ingredients, beating just until thoroughly mixed.  Portion the dough into heaping tablespoons and roll into balls.  Place on a baking sheet and chill until the oven is ready.

Preheat to 350 degrees F.  Prepare baking sheets with parchment or silpats.
                       
Combine 1/2 cup sugar and 1 teaspoon cinnamon in a small bowl.  Roll the cookie balls in the mixture and place them 2" apart on the baking sheets.

Bake until puffed and set but still moist, about 10-12 minutes, rotating the sheets halfway through.
                       
Remove from the oven and immediately make an indentation in the center of each cookie with the small end of a melon baller or the bottom of a rounded measuring teaspoon.  Place the pans on a wire rack and cool completely.
                       
Finely chop remaining 2 tablespoons hazelnuts and set aside.

Finely chop the chocolate and melt with the remaining 2 oz butter in a small heatproof bowl over a barely simmering water bath or at 10-second intervals in a microwave, stirring often, until melted.  Fill the wells of each cookie with the chocolate and immediately garnish with the reserved nuts.  Set the cookies aside until the chocolate is set, about 20 minutes. 

Friday, October 9, 2015

Chocolate Dipped Almond Horseshoe Cookies


It’s the moment for cookie making.  Right about this time of year is when I start to think about the holiday pastries in my repertoire and what kind of experimenting and developing I want to do to keep things interesting for the season.

This is another very simple nut cookie that has a crisp and light quality along with the added bonus of a little dip in chocolate.  The cookie is flavored with almonds and vanilla and a touch of cinnamon.  I also include a small amount of unhulled sesame seeds for added texture and flavor.  The dough is mixed in a food processor so it’s quick and easy once you assemble all your ingredients. 

Speaking of assembling ingredients, I ran across an article on how to approach recipes and time spent in the kitchen.  It really rang true for me so I thought I’d recommend it to you.  It’s about visualizing your preparation of a dish before you begin.  Anyone who’s ever worked in a professional kitchen knows this rhythm very well.  You imagine in your head and think through the prep first before you even get started.  You read the recipe a couple of times and you can see and almost taste the desired result.  You think about the collection of ingredients and each step you need to take to get to the final product.  Organizing yourself in this way makes it much easier to actually cook or bake and it helps prevent any last minute surprises.  It makes the whole thing that much more pleasurable and builds your confidence about what you’re doing and why you’re doing it.  I find this especially true for pastry.  Check it out!

You can shape these cookies any way you’d like.  I went for a horseshoe as a symbol of good luck.  I think finding homemade cookies in your midst does happen to feel quite lucky, especially when it's a simple nut cookie dipped in chocolate.


Bench notes:
- I like to use sliced almonds because they grind to a finer crumb.  To toast them, spread them out in a single layer on a baking sheet and place in a 350 degree F oven for about 5 – 7 minutes.  Watch them closely as they will burn quickly.
- A #40 ice cream scoop helps to portion the cookie dough.
- When shaping the dough into logs that form the horseshoes, make sure the pieces are the same thickness from middle to ends so they will bake evenly.
- I shape the cookies into horseshoes on the baking sheet so I don’t have to lift and move them.
- I recommend semisweet chocolate for the coating because the cookies aren’t terribly sweet.


Chocolate Dipped Almond Horseshoe Cookies
Makes 30 cookies

2 cups (10 oz) flour
1 cup (3 oz) sliced toasted almonds
1/4 cup (1 oz) sesame seeds
1/2 cup + 2 tablespoons (4 1/2 oz) sugar
1/4 teaspoon salt
1/2 teaspoon cinnamon
8 oz (16 tablespoons) cold unsalted butter
1 egg yolk
1 3/4 teaspoons vanilla extract
1/4 teaspoon almond extract

Chocolate Coating
4 oz semi-sweet (62%) chocolate                      
2 oz (4 tablespoons) unsalted butter                                                                             

Preheat oven to 350 degrees F.   Prepare baking sheets with parchment or silpats.

Place the flour, almonds, seeds, sugar, salt and cinnamon in the bowl of a food processor and process until the nuts are finely ground.  Cut the cold butter into 1/2” pieces and add to the flour mixture along with the egg yolk, vanilla and almond extracts.  Process until the mixture collects into damp clumps. Place the dough in a bowl and cover it tightly.   Chill for 2 - 4 hours or until the dough has firmed up enough to handle with ease.

Preheat oven to 350 degrees F.  Prepare baking sheets with parchment or silpats.

Portion the cookie dough into 1 1/2” balls.  Then form each one into 3 1/2” logs of uniform thickness.  Place them on the prepared baking sheets and shape each one into a horseshoe.

Bake until only slightly colored on the top and golden brown on the bottom, about 15 - 17 minutes.  Rotate baking sheets halfway through to ensure even baking and browning.  Remove and place on a wire rack until cookies are completely cool.

For the chocolate coating, finely chop the chocolate.  Place in a heatproof bowl with the butter and melt over a pot with an inch or two of barely simmering water, making sure the bottom of the bowl isn’t touching the water.  Stir to thoroughly combine.  Remove from heat. 

Dip the ends of each cooled cookie into the bowl.  Scrape the excess from the bottom of the cookie against the edge of the bowl and place on a wire rack or silpat to dry.

Friday, September 4, 2015

Chewy Chocolate Caramel Chip Cookies


Every now and then you need a chewy cookie.  There’s no doubt that crumbly shortbread and crispy butter cookies are the stuff of dreams.  There’s something about a crunchy texture that does the trick.  But sometimes a chewy cookie also clocks in quite well on the cookie meter.

This is a chocolate version of a chewy cookie that is made with cocoa for an earthy chocolate richness and brown sugar for flavor and soft texture.  There’s also a good bit of cinnamon and some caramel chocolate chips to ramp it all up just perfectly.

The cookie dough is mixed in the conventional way by first creaming the butter and sugar and then adding an egg and the dry ingredients.  I recommend chilling the cookie dough overnight if you can to make sure everything has a chance to co-mingle properly.  Bake them for just 12 minutes and then give them a try.  I suggest a nice cup of coffee or cold glass of milk as your partner. 


Bench notes:
- I like to let cookie dough chill overnight to allow the flavors to develop.
- Once you add the flour, do your best not to overmix.  I usually take cookie dough and cake batter off my mixer just right before they’re completely and fully blended and then finish the mixing by hand. 
- For even baking and browning, I bake one cookie sheet at a time in the center rack, rotating the baking sheet halfway through.
- It’s hard to tell when a chocolate cookie is done because you often can’t really see the browning.  For this cookie, it’s better to be slightly underdone or you risk having a dry cookie. I bake these for 12 minutes.  If you’re unsure of your oven, you can try a couple testers before you bake the whole batch.
- Full disclosure:  I did some recipe consulting in May 2014 with Nestle’s development team on their new Toll House chocolate chip flavors.  However, I have not been compensated in any way for the use of their caramel chocolate chips in this recipe.  I really do like this product and would never recommend any ingredient I did not feel to be worth trying no matter the nature of my association with product representatives.


Chewy Chocolate Caramel Chip Cookies
Makes 2 dozen cookies

1 1/4 cups (6 1/4 oz) flour
1/4 cup (3/4 oz) cocoa powder
1/2 teaspoon baking soda
1/4 teaspoon salt
1/2 teaspoon cinnamon
4 oz (8 tablespoons) unsalted butter @ room temperature
1/4 cup + 2 tablespoons (2 3/4 oz) granulated sugar
1/4 cup + 2 tablespoons (2 3/4 oz) dark brown sugar, packed
1 egg @ room temperature
3/4 teaspoon vanilla
1/2 cup (3 oz) chocolate chips [I used Nestle Chocolate Caramel Chips]

Sift the flour, cocoa powder, baking soda, salt and cinnamon.

Cream the butter and both sugars until light and fluffy, about 2 – 3 minutes, scraping down the bowl once or twice.  Add the egg and mix thoroughly until fully incorporated, scraping down the bowl.  Add the vanilla and mix.  Add in the flour mixture and blend until there are no dry streaks.  Mix in the chocolate chips.

For optimal flavor, place the cookie dough in an airtight container and chill overnight. 

Preheat the oven to 350 degrees F.  Prepare two baking sheets with parchment or silpats.  

Shape the cookie dough into 1 1/2” balls and place 12 on each baking sheet.  Bake for 12 minutes, one baking sheet at a time.  Place the pans on a wire rack to cool. 

Friday, August 21, 2015

Ultra Chocolate Sherbet


If you’ve ever loved Fudgsicles, you’re going to really love this sherbet.  Although it’s served in a bowl rather than on a stick, you will no doubt quickly devour the creamy, chocolatey awesomeness of this scoop.

With no eggs and not a whole lot of cream, this doesn’t quite have the richness of chocolate ice cream but it does have more than a ton of flavor.  It has a good dose of both chocolate and cocoa, so it’s fudgey without being too heavy and it's smooth without coating your palate.  I think it's perfect.

For those who really cherished Fudgsicles as a kid, this is a super delicious trip down memory lane, only much, much better.  I promise, a bowl of this sherbet will fire up all your best chocolate neurons.  And as today marks the 8th anniversary of my blog, I can't think of a better way to celebrate!

Bench notes:
- I used natural undutched cocoa powder.
- 6 oz of chocolate is 1 cup chopped.  For the best flavor and texture, please do use a block of chocolate, not chocolate chips.
- The cornstarch helps to inhibit ice crystal formation.
- A pinch of cinnamon is added to give just a bit of depth. 
- For another adventure in extreme chocolate bliss, try super deluxe Mexican Chocolate Ice Cream.


Ultra Chocolate Sherbet
Makes about 1 quart

6 oz semisweet (62%) chocolate
3/4 cup (2 1/4 oz) cocoa
1/2 cup + 1 tablespoon (112 grams) granulated sugar
3 tablespoons (39 grams) dark brown sugar, packed
1 tablespoon (9 grams) cornstarch
1/4 teaspoon salt, to taste
3 cups (24 oz) milk
3/4 cup (6 oz) heavy cream                                               
3/4 teaspoon vanilla
1/8 teaspoon cinnamon

Finely chop the chocolate and place in a heatproof bowl set over a pan with about 1" barely simmering water.  Melt the chocolate, stirring until smooth.  Take off the heat and set aside.

Place the cocoa, both sugars, cornstarch and salt in a saucepan. Add about 3/4 cup milk and whisk until smooth.  Whisk in the remaining milk.  Bring to a simmer over medium heat, stirring constantly.  Cook for about 2 more minutes. 

Take off the heat and whisk in melted chocolate, heavy cream, vanilla and cinnamon.  Taste and adjust for salt, adding a few grains at a time.  Cool.  Pour into an airtight container and refrigerate until thoroughly chilled, preferably overnight.  

Freeze in your ice cream maker according to the manufacturer’s instructions.  Pour into an airtight container, press a piece of plastic wrap into the surface, cover and place in your freezer to firm up. 

Friday, August 7, 2015

Chocolate Cherry Cupcakes


Although chocolate all on its own is a powerfully soothing bite, I also like the combination of chocolate and fruit.  When the acidity of both is in balance, I think it works beautifully.  I think this is true for raspberries, strawberries, bananas, apricots, figs, cranberries and cherries.

Cherries have been really good this season - sweet, juicy and plentiful.  So I decided to use part of my stash to turn out some simple chocolate cupcakes with a buried treasure of cherries.  The cherries are simmered for just a few minutes to soften them up and to flavor them with some spice for extra intrigue.  The cupcake is tender and enriched with the depth of cocoa.  So simple and so irresistible.  If you're a fan of chocolate cupcakes - and really, who isn't - I think you'll find this combination a worthy one.

Bench notes:
- I sometimes like to use star anise with cherries.  Just a couple of points from a star are plenty in this compote to give them a nice twist.  The cherries can be made a day or two ahead. Place in an airtight container and chill until ready to use.
- I first tested this recipe using cake flour and I absolutely loved the results.  But the cupcakes were super tender and didn't hold together very well.  So all-purpose flour will add a bit more strength to the texture.  But try cake flour if you don't mind the extra tenderness.
- Since these cakes are very tender, I recommend using paper liners to avoid trying to wrestle them out of the pan.  Lightly greasing the rim circumference of each well will also help ensure the tops will loosen easily.
- The high ratio of sugar to butter in the cake recipe requires you to cream the mixture for about 5 - 6 minutes on medium speed until it is light in color and fluffy in texture.  It starts out grainy, then turns into small clumps, then lumps into a ball and then eventually smoothes out to a cohesive fluffy mixture.  At first you’ll wonder how it’s ever going to come together but it will. Honest!
- When using a cherry pitter tool, be extra careful to account for all the cherry pits. Even though it does a great job of piercing the fruit, sometimes the pits stay lodged in the center, so check and be sure you can account for all of them!
- Drain off the juices before placing the cherries in the cupcake batter (I placed 2 at a time).  The cherries should still be moist but you don’t want the batter to get soupy.  Use the drained syrup and any extra cherries to flavor oatmeal or yogurt.


Chocolate Cherry Cupcakes
Makes 12 cupcakes

12 oz fresh cherries
2 tablespoons (39 grams) sugar, to taste
1/8 teaspoon cinnamon
2 points of 1 star anise

1 1/2 cups (7 1/2 oz) flour
1/2 teaspoon salt
3/4 teaspoon baking soda
1/4 cup + 2 tablespoons (31 grams) cocoa powder
1/4 cup + 2 tablespoons (3 oz) hot water
3 oz (6 tablespoons) unsalted butter @ room temperature
1/2 cup + 1 tablespoon (112 grams) granulated sugar
1/2 cup + 1 tablespoon (112 grams) dark brown sugar, packed
2 eggs @ room temperature
1 1/2 teaspoons vanilla
1/4 cup + 2 tablespoons (3 oz) milk

For the cherries, stem and pit them and place in a saucepan.  Add the sugar, cinnamon and star anise and simmer, stirring occasionally, until the fruit begins to soften, about 3 – 4 minutes. Take off the heat and cool.  When ready to use, discard the star anise.

Preheat your oven to 350 degrees F.  Line a standard cupcake tin with paper liners.

For the cupcakes, sift together the flour, salt and baking soda.  In a separate bowl, whisk cocoa and hot water together until thoroughly blended.

Cream butter and both sugars until light and fluffy, about 5 - 6 minutes on medium speech in a stand mixer (see the fourth bench note above).  Stop and scrape down the bowl at regular intervals. Add eggs one at a time and blend well before adding the next.  Scrape down the bowl. Add cocoa mixture and vanilla and combine thoroughly.

Add the dry ingredients in 3 additions, alternating with half the milk and beginning and ending with the dry ingredients.  Stop mixing just before it is fully blended and finish by scraping the bottom of the bowl and folding with a rubber spatula until there are no streaks.  Distribute equally into the prepared cupcake liners.  Submerge 2 drained cherries into the batter of each cupcake.

Bake until a toothpick tests with a few moist crumbs adhering, about 20 to 22 minutes.  Cool 10 minutes.  Run a thin bladed knife around the edges to loosen and turn out the cupcakes.  Cool completely.  

Friday, July 17, 2015

Chocolate Loaf Cake


When the mood strikes and you want a slice of plain cake, chocolate usually comes to mind.  Loaf cakes often settle this desire quite well.  The larger round shape for cakes is likely modeled from ancient bread and persisted through their highest point of popularity in the Victorian era.  But in modern times, cakes began to take on many different forms as they morphed into muffins, cupcakes and loaves - different versions that we can enjoy and not feel like we’re subject to any sort of penance.  

This cake has a good buzz of chocolate with some spice to round out the cocoa.  It has a soft texture and isn't too rich or too heavy.  I dressed it up with some chocolate glaze for a more formal presentation but it’s really a simple and straightforward cake that can be enjoyed plain or with a light dusting of powdered sugar.  Easy peasy.

If it’s the simple pleasure of a nice slice of plain cake you desire, fire up that oven and get going.  You’re just a hop, skip and a jump away from Chocolate Loaf Cake.


Bench notes:
- I used natural (not dutched) cocoa powder.
- Mixing cocoa powder with hot water helps to “bloom” the flavor.
- For the frosting, stir slowly to avoid cooling it down too fast before it's well blended and creating air bubbles.
- Add 1/2 cup chopped toasted walnuts to the batter for a contrast of texture and nutty flavor.


Chocolate Loaf Cake
Makes 1 loaf

1 1/4 cup (6 1/4 oz) flour
1/2 teaspoon baking soda
1/2 teaspoon salt
1 teaspoon cinnamon
1/2 teaspoon cardamom
1/4 teaspoon allspice
1/2 cup + 2 tablespoons (1 3/4 oz) cocoa powder
1/2 cup + 2 tablespoons (5 oz) hot water
6 oz (12 tablespoons) unsalted butter @ room temperature
3/4 cup (5 1/4 oz) granulated sugar
3/4 cup (5 1/4 oz) dark brown sugar, packed
3 eggs @ room temperature
2 teaspoons vanilla
1/2 cup (4 oz) sour cream

3 oz bittersweet chocolate, finely chopped
1/4 cup (2 oz) heavy cream

Preheat your oven to 350 degrees F.  Grease an 8 1/2” x 4 1/2” loaf pan and line with a piece of parchment paper large enough to form an overhang along both sides of the length of the pan.

Sift the flour, baking soda, salt and spices together.  In a separate bowl, whisk the cocoa and hot water together until thoroughly blended and smooth.

Cream the butter and both sugars until light and fluffy, about 3 to 5 minutes.  Scrape down the bowl and add eggs one at a time, making sure that each one is incorporated before adding the next and scraping down the bowl as necessary.
Add the cocoa mixture and vanilla and combine thoroughly.  Add the dry ingredients in 3 additions, alternating with half the sour cream and beginning and ending with the dry ingredients.  Mix just until well blended.  Pour the batter into the prepared pan and gently tap the bottom of the pan on the work surface to remove any air bubbles.

Bake for 50 - 55 minutes or until a toothpick tests with a few small moist crumbs adhering.  Place on a wire rack and cool 10 minutes.  Run a thin bladed knife around the edges and lift out the cake using the parchment to assist.  Gently peel off the parchment and invert again.  Cool completely.

For the glaze, place the finely chopped chocolate in a heatproof bowl.  Bring the cream to a simmer.  Pour immediately over the chocolate and let it sit for a minute so the heat penetrates.  Stir gently in concentric circles until smooth.  Frost the cake when it's thick enough to spread.

Friday, June 5, 2015

Ultra Thin Chocolate Chunk Cookies


When esteemed chocolate expert and cookbook author Alice Medrich advises, I listen.  Her cookbooks are flawless examples of thorough testing and expertise, which result in reliably superb pastries and desserts.  It’s no wonder every cookbook she releases is an instant hit and award winner.

Alice is particularly proficient at creating wonderful cookies.  It’s interesting to note that her recipe for this Ultra Thin Chocolate Chunk Cookies comes with a few very explicit dos and don’ts.  They’re not terribly complicated but they are necessary to achieve the right taste and texture: a dramatically large, ultra thin and crisp cookie loaded with caramel flavor and wonderful bites of chocolate.

First, you need to let the cookie dough rest overnight for maximum flavor.  Second, these cookies need to be baked on foil for the cookie to acquire the right level of crispness.  And since these cookies spread out to about a 5” diameter, you’ll need to place only 5 per sheet pan.  You’ll also need to flatten the cookie dough to a diameter of about 3 1/2” before baking so they’ll spread out properly.  Lastly, the cookies need to bake for 20 – 25 minutes to achieve the right caramelization and super crisp texture.  If you don’t bake them until they take on some good color, they won’t crisp up after they cool.

So, if you don’t mind playing by the rules, give this recipe a try.  You’ll wind up with quite a good snappy cookie, a worthy departure from the usual chocolate chip variety.  


Bench notes:
- Do follow Alice’s advice on all these steps and you’ll get a full-flavored cookie that really snaps.
- Make sure the dough is cool after adding the melted butter before you add the chocolate chunks so they won’t melt while mixing.
- If you need to bake these cookies the same day, let the dough rest for a few hours at room temperature.
- Slide the cookies and foil onto wire racks and proceed to the third batch.  Let the cookies cool on the foil.
- A small offset spatula is very handy for removing the cookies after they’ve cooled.
- The cookies will keep in an airtight container for about 3 days.  Good luck with that.


Ultra Thin Chocolate Chunk Cookies
Makes fifteen 5” cookies

5 oz (10 tablespoons) unsalted butter                           
1 1/3 cups (170 grams) flour                   
1/2 teaspoon baking soda                                                                       
1/2 cup (42 grams) oatmeal                                            
1/2 cup (100 grams) granulated sugar                                      
1/4 cup (50 grams) dark brown sugar, packed                        
2 tablespoons plus 1 teaspoon (55 grams) light corn syrup
2 tablespoons whole milk                                                            
1/2 teaspoon salt                                                                           
7 ounces (200 grams) bittersweet (72%) chocolate, coarsely chopped into small chunks
                                                                                                           
Melt the butter and set aside to cool.

Whisk together the flour and baking soda and set aside.

In a separate bowl large enough to hold all the ingredients, stir together the melted butter, oats, both sugars, corn syrup, milk, and salt.  Add the flour mixture and combine thoroughly.  Stir in the chocolate chunks.  Cover the dough with plastic wrap and chill overnight.

Preheat oven to 325 degrees F.  Position your oven racks in the upper and lower thirds of the oven.

Divide the dough into 15 equal pieces, each one a scant 1/4 cup (or 50 grams each if you have a scale).

Line 3 baking sheets with aluminum foil.  Place 5 pieces of dough (4 in a square pattern and 1 in the center) on each sheet of foil. Use your fingers to flatten each piece to about 3 1/2” in diameter. 

Bake until the cookies are thin and browned, about 20 to 25 minutes, rotating the pans from top to bottom and front to back halfway through the baking time to ensure even baking.  Slide the foil with the cookies onto racks and leave them on the foil to cool completely.

Friday, May 1, 2015

Brown Sugar Chocolate Crumb Cake


In the universe of coffee cakes, the crumb cake has its own orbit.  There’s just something about those beautifully crisp buttery crumbs that compel us to reach for a slice.  The origins may have come from the streuselkuchens of Germany but make no mistake, crumb cakes are very much a part of American baking culture as a result of the influx of immigrants to New York.

Crumb cakes are by nature very simple.  This one is an incredibly tender cake, thanks to the brown sugar, butter and milk that moisten and tenderize, resulting in really nice soft crumb.  For something a little different, I took a slight detour and added cocoa powder to the crumb mixture.  It’s a delicious change-up if chocolate is your trusty friend. 

This cake is super easy to pull together.  And since I always think of spring and summer as brunch season, you’ll want to add this recipe to your collection alongside all those other kugelhopf, bundt and streusel-laden gems.  Let me assure you, the aroma of this cake baking in your kitchen is the best kind of morning wake-up call, impossible to resist.


Bench notes:
-  I use my hands to mix the crumb topping.  It takes about 3- 4 minutes because the brown sugar, flour and cocoa become a pretty fine powder when combined.  But if you keep working it as directed, it comes together in nice clumps.
- The salt in the crumb mixture is there to enhance the cocoa powder. 
- Room temperature butter is not oily or soft.  It should give just a bit when you press a finger into the surface.
- Cream butter and sugar on medium speed to avoid breaking the fragile air bubbles you’re trying to create.  This is the stage where the texture and crumb are being developed.
- A quick way to bring eggs to room temperature is to place them in a bowl of hot water for a few minutes.  Cold eggs will impact the volume of the cake.
- For cake mixing, always add eggs one at a time, mixing thoroughly before adding the next.  The batter is ready for the second egg when it no longer has a shiny slick on the surface.  
- Scraping down the bowl of your mixer is crucial to thoroughly emulsifying the butter and egg mixture and then fully integrating all of the remaining ingredients.  It may seem like a bother but it’s what helps to build the structure of your cake.
- Don’t skip the allspice.  Contrary to popular belief, allspice isn’t a blend of a lot of different spices. It’s actually the sun dried unripened berry of the Pimenta dioica plant.  It's sometimes referred to as Jamaica Pepper because early spice explorers striking out to the New World believed they had discovered the black pepper they coveted.  The term "allspice" is likely due to the fact that its aroma and flavor strongly suggest the flavors of cinnamon, nutmeg, black pepper and cloves.  Allspice does contain a trace of eugenol, the essential oil that gives cloves their distinctive flavor.  I often use allspice as a backnote to amplify other spices, especially cinnamon.  It’s also a key ingredient in Caribbean jerk dishes.  
- My crumbs didn't dislodge when I turned out the cake.  You can use a 9" springform pan if you prefer.
- More brunch ideas on Pinterest


Brown Sugar Chocolate Crumb Cake
Serves 8

Chocolate Crumb
1/2 cup (3 1/2 oz) dark brown sugar, packed
1/3 cup (1 5/8 oz) flour       
3 tablespoons (15 grams) cocoa powder                     
1/2 teaspoon cinnamon                                                                
1/8 teaspoon salt                                                               
2 oz (4 tablespoons) cold unsalted butter                                                                     

Cake
1 1/2 cups (7 1/2 oz) flour                                                             
1 1/2 teaspoons baking powder                                                 
1/4 teaspoon salt
1 teaspoon cinnamon
1/4 teaspoon allspice
4 oz (8 tablespoons) unsalted butter @ room temperature
1/2 cup (3 1/2 oz) dark brown sugar, packed             
1/4 cup (1 3/4 oz) granulated sugar                                
1 1/2 teaspoons vanilla
2 eggs @ room temperature
1/2 cup (4 oz) milk @ room temperature

Preheat oven to 350 degrees F.  Lightly grease a 9” x 2 1/2 “ cake pan and line the bottom with a circle of parchment paper.

For the chocolate crumb, place the brown sugar, flour, cocoa, cinnamon and salt in a bowl.  Stir together until it looks like a fine powder.  Cut the cold butter into 1/4” pieces and toss with the cocoa mixture.  Pinch the butter until it flattens into smaller pieces that resemble small peas.  Then grab big handfuls of the mixture and squeeze it together until it begins to adhere into large compressed clumps.  This will take about 3 – 4 minutes.  Then take the large clumps and break them into smaller clumps.  Chill until ready to use.

For the cake, sift flour, baking powder, salt, cinnamon and allspice together and set aside.

Cream butter and both sugars until light and fluffy, about 3 minutes, scraping down the sides of the bowl as needed.  Add vanilla and blend.

Beat in eggs one at a time, mixing thoroughly after each addition and scraping down the bowl as needed.  Add a third of the flour mixture alternately with half the milk, beginning and ending with the flour.  Scrape down bowl to be sure everything is incorporated.  Pour the batter in the prepared pan and spread evenly.  Cover the top of the cake batter with chocolate crumb mixture and gently press down just a tiny bit.

Bake until a tester inserted in the center of the cake comes out clean, about 30 – 32 minutes.  Place on a wire rack to cool for about 15 minutes.  Run a thin knife along the edges and invert the cake.  Remove the parchment and turn the cake again so it’s right side up.  Cool completely.