Friday, August 30, 2013

Strawberry Tarte Tatins


If you’ve ever had Tarte Tatin, you know it’s one of the best desserts you could ever possibly desire.  It consists of caramelized apples baked with a circle of pastry dough placed on top and then flipped over to reveal tender fruit, great caramel and buttery pastry.  It’s traditionally served with crème fraiche or a slice of Camembert.  Super good.

For something slightly different but just as supremely delicious, strawberries are used in this recipe in place of the apples.  Their tart acidity is a perfect foil for the caramel.  I also add a splash of balsamic for some delicious complexity.  The water content of the strawberries renders the juices into a luscious thinner sauce rather than a caramel per se and the flavor of the fruit combined with the buttery pastry is irresistible. 

I use a simple butter pastry called Rough Puff.  It’s a very streamlined version of puff pastry that isn’t difficult or complicated, it just takes a bit of time.  You can of course substitute store bought puff if you prefer or make your own favorite butter pastry.  

While strawberries are looking so beautiful and still in good supply, this is a great dessert to serve after a sumptuous summer dinner.  It's a simple combination of ingredients that really delivers a good measure of pure pleasure.  A dollop of whipped cream is a must. 


Bench notes:
- Donna Hay’s recipe is for 4 servings but I double it for 6 servings.  I didn’t think there was enough caramel sauce in the original recipe and I used a bit more strawberries.
- The dough comes together very quickly in a food processor.  It will not look like a dough but rather like a slightly moist cottage cheese.  The important thing is to keep visible pieces of butter in tact and avoid blending it all into the flour.  
- When shaping and folding the dough, do your best to keep the edges straight and aligned when folding.  Lightly dust with flour as you go and then brush off any excess flour before folding.
- Use ramekins that are 4” x 1 3/4” because the fruit does bubble up quite a bit during the baking process.
- The caramel should only be a light golden brown, not dark as with Apple Tarte Tatin.


Strawberry Tarte Tatins                                               
adapted from Donna Hay
Makes 6 servings

Rough Puff Pastry
1 1/4 cups (6 1/4 oz) flour                                             
1/4 teaspoon salt                                                                                    
4 oz (8 tablespoons) very cold butter
6 tablespoons (3 oz) very cold water

1 3/4 - 2 lbs fresh strawberries
2 oz (4 tablespoons) butter                                                        
1/2 cup (3 1/2 oz) sugar                                    
3 tablespoons (1 1/2 oz) water                                                              
1 vanilla bean
1 1/2 - 2 teaspoons balsamic vinegar, to taste

1/2 cup (4 oz) heavy cream
1 teaspoon (4 grams) sugar

For the pastry dough, place the flour and salt in the bowl of a food processor and combine.  Cut the cold butter into 1/2” cubes and add.  Pulse just until the butter is the size of small peas.  Add the cold water and pulse just until the mixture resembles something like a slightly moist cottage cheese.  Gather the dough and place on a piece of plastic wrap.  Form a disc, seal it tightly and chill for 1/2 hour.

Lightly flour a work surface.  Roll the dough out to about an 8” x 4” rectangle, lightly flouring as needed.  Fold the shorter sides of the dough in equal thirds like a letter, keeping the edges as evenly lined up as possible.   With the open edges perpendicular to you and seam side down, roll it again into an 8” x 4” rectangle, lightly dusting with flour as needed and then using a pastry brush to remove any excess flour before folding.  Turn it and fold the shorter sides of the dough again into thirds.  Repeat this process one more time for a total of three times.  If at any point the dough starts becoming too soft or elastic, let it rest in the refrigerator for a while before continuing.  Lastly, roll the dough out into a rectangle about 1/4” thick.  Take both shorter sides and fold toward the center like a book, keeping the edges as straight as possible.  Then fold one side over the other so there are 4 equal layers on top of one another.  Wrap the dough and rest in the refrigerator for 1/2 hour. 

Roll the dough out on a lightly floured surface until it is about 1/8” thick.  Brush off any excess flour.  Cut out circles 4 1/4” in diameter and place on a baking sheet.  Chill until ready to use.

Preheat oven to 400° F.   Lightly butter six 4 ounce ramekins.

Hull and cut the strawberries in half.  Distribute them among the ramekins, cut side up.  Set aside.

Place the butter, sugar and water in a saucepan.  Split and seed the vanilla bean and add.  Bring to a boil over medium heat, stirring once to combine.  Boil until it starts to take on a golden color, about 3 minutes.  Take off the heat and add the balsamic vinegar.  Remove the vanilla bean.

Pour the caramel mixture over the strawberries.  Top with the round pastry dough circles, pressing down slightly and tucking in. 

Place the ramekins on a baking sheet and bake until the pastry is golden brown and the fruit is bubbling vigorously, about 25 – 30 minutes.   Set the baking sheet on a wire rack and let the tatins rest for about 10 minutes.  Carefully turn out the tatins by placing a plate or shallow bowl on top of the ramekin and inverting quickly.   

Whip the cream and sugar to soft peak.  Serve the tatins warm with a dollop of cream.

Friday, August 23, 2013

Sour Cream Shortcakes with Berries


This week marks my blogiversary!  It was 6 years ago this week that I convinced myself to try this blogging thing.  I didn’t really have a specific strategy or long-term vision for this space.  I’d left the world of professional pastry kitchens to take a great 4-year assignment as an analyst consultant in my other chosen field, higher education administration.  But I started to miss the smell of flour and butter.  I began reading lots of blogs and I wondered if I could somehow produce a blog, too.  It seemed like everyone was having fun and I knew I had to give it a try.  I love technology but I had absolutely no idea how to create and administer a blog or how to use a camera.  I made up my mind to just jump in, determined to challenge my skills.  Well, lots and lots of cakes, cookies, tarts, custards, ice cream and a whole lot of other stuff later, I’m still here, posting my pastries each week.  I saw my blog go from zero to tens of thousands of readers every month.  So yeah, WOW, I did it!  And it's been interesting and satisfying in ways I never could have predicted.

I’ve kept the blog simple: no advertising or animated pop-ups and no fancy or complicated recipes or platings.  My passion for creating fun and delicious pastries and desserts along with having such a great audience of readers are what keep me in the game.  I’ve presented the stuff I think is most likely to elicit a swoon from those gathered at your table and it’s been a supreme pleasure to learn so much about this incredible medium.

So let’s celebrate this milestone with a must-have pastry of the season: shortcake!  This is a fairly basic recipe to which I’ve added a nice portion of sour cream for extra tenderness and a very slight tangy note.   It goes perfectly well with the season’s current crop of fresh fruit: bright berries, swoon-worthy peaches, juicy nectarines, tart plums and luscious figs.  Add a dollop of sweetened whipped cream or crème fraiche and it’s a pretty iconic and irresistible plate of summer goodness.   So, as we begin our sure and steady shift into an autumn that is lurking just around the corner, I recommend this to you as a celebration of the really good summer we've had, chock full of unusually terrific fruit.

I want to send a big note of thanks to all my readers and all the bloggers who have reached out to me over the years.  You inspire me.  I really appreciate all your emails and lovely feedback on my work.  Your kindness has been one of the greatest benefits of blogging.  And I love that many of my readers are from other corners of the world.   I thank you all for your interest and support.  I hope you’re having as much fun as I am.

OH, and one more thing.  Watch this space in early September.  I have a really fun and exciting announcement coming, one I hope you’ll enjoy.  Stay tuned!


Bench notes:
- There are just a few things to remember when mixing a biscuit or scone type dough. 1) Both the liquid and the butter must be very cold.  2) Once you add the cold butter, work fast to incorporate it into the flour so that it stays cold. You can use a pastry blender or your fingers to get the butter reduced down to pea-sized pieces. 3) When you add the liquid, use a fork to stir it together. It shouldn't take more than 10 or so rounds of stirring. The dough will look lumpy. 4) Lightly dust your work surface and your hands with flour. Place the dough on the work surface and pull it together with about 3 - 4 very light kneads. You don't want to overwork the dough but you also don't want a pile of clumps. So be gentle and you'll see it come together very quickly. 5) Pat the dough to form a round that's about 1 " thick. Using a biscuit or cookie cutter, press down to form the biscuits and lift straight up when you're done. To prevent sealing the edges of the biscuit, no twisting or turning the cutter.
- I use a 2 1/2” cutter.  The baked shortcakes expand to about 3 1/4”.  It's also fun to make smaller mini shortcakes for a party tray.  Just watch the baking time closely.
- I use a serrated knife and a sawing motion to cut the shortcakes in half.
- For the cream garnish, substitute 1/2 cup fraiche for half the heavy cream for a more complex flavor.
- Add a drop of good kirsch to the fruit or the cream garnish.
- Shortcakes are best eaten the same day.


Sour Cream Shortcakes with Berries
Makes 8 servings

2 cups (10 oz) flour                                                                      
1/4 cup (1 3/4 oz) sugar
1 tablespoon baking powder                              
1/2 teaspoon baking soda
1/2 teaspoon salt                                                  
4 oz (8 tablespoons) cold butter                        
1/2 cup (4 oz) cold sour cream
1/2 cup (4 oz) cold heavy cream         
1 teaspoon vanilla
1/4 teaspoon almond extract

melted butter, for brushing

1 cup fresh strawberries, hulled and sliced
1 cup fresh raspberries
1 cup fresh blueberries
2 – 3 tablespoons (26 – 39 grams) sugar, to taste

1 cup (8 oz) heavy cream
1 tablespoon (13 grams) sugar
1/2 teaspoon vanilla extract

Preheat oven to 375°. Line a baking sheet with parchment paper or a silpat.

Sift the flour, sugar, baking powder, baking soda and salt into a bowl.  Cut the cold butter into 1/2-inch cubes and add, tossing thoroughly to coat all the pieces of butter with flour.   Using your fingers or a pastry blender, pinch and flatten the butter into small pieces until the mixture looks like coarse meal with some smaller pieces about the size of small peas.  Work quickly to keep the butter from warming up and softening.

Combine the sour cream, heavy cream, vanilla and almond extracts.  Make a well in the center of the dry ingredients and add the cream mixture.  Using a fork, fluff the flour into the center.  Stir and turn the ingredients until large moist clumps form and you have a soft dough.

Dust your work surface and your hands very lightly with flour and turn out the dough. Give it a gentle kneading; about 3 - 4 turns should be enough to consolidate the dough. Pat it into a round about 1" thick.  Use a 2 1/2" cutter to form the shortcakes, pushing straight down and lifting straight up to cut rather than twisting.  Dip the cutter into some flour between each cut to prevent them from sticking.  Place the shortcakes on the prepared baking sheet. Gather the scraps and stack them. Gently press and pat them into a piece about 1" thick and cut out additional shortcakes.

Brush the tops lightly with melted butter. Bake until they are puffed and the bottoms are golden brown, about 12 - 14 minutes. Place on a wire rack to cool. 

Combine the berries with the sugar and set aside for about 15 minutes, stirring from time to time to distribute the juices.

When ready to assemble, whisk the heavy cream, sugar and vanilla until soft peaks form.  Cut the shortcakes in half and place the bottom halves on plates.  Dollop with whipped cream and strawberries.  Top with remaining biscuit halves.

Cheers!

Friday, August 16, 2013

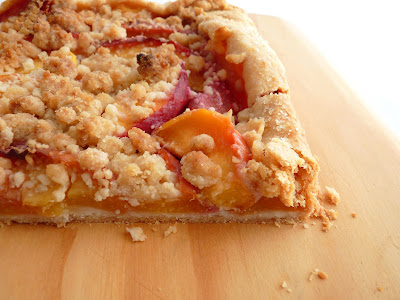
Nectarine Crumb Tart


If you’re wondering what the difference is between a peach and a nectarine, it’s fairly superficial.  Peaches have fuzzy skins and nectarines have smooth ones.  Nectarines are also usually slightly smaller and sweeter.  But in terms of nutrition, nectarines provide twice the amount of vitamin A, a bit more vitamin C and a whole lot more potassium.

Red Lion nectarines, cultivated in California in the late 1980s, are considered among the best. They stay on the tree longer, so they are plump and juicy.  When selecting nectarines, look for a deep red blush but more importantly, they should have a golden orange glow with no green areas around the stem.  Store them at room temperature and they will continue to ripen.

This tart is a good showcase for ripe nectarines because there isn’t much to get in the way of their full flavor.  There’s a simple crust and a toasted crumb topping, just enough to sweeten each slice.  And of course you can substitute peaches!


Bench notes:
- I prefer room temperature fruit but if you prefer chilled, don't refrigerate a peach or nectarine until it's fully ripe or its flavor will be stunted and the texture may become mealy.
- This pastry dough comes together almost instantly.  Check it as you go to be sure you're not overmixing.  It's done when the dough looks a little bit like small curd cottage cheese.  When you gather it together to wrap, it smoothes out.
- The pastry dough can be made 1 - 2 days ahead and chilled.  Any longer than that and it starts to discolor and turn grey.
- The crumble can also be made and refrigerated 1 – 2 days ahead.
- Add a small handful of sliced almonds or finely chopped walnuts to the crumb topping flour mixture if you’d like more flavor and texture.
- Serve with sweetened whipped cream flavored with vanilla or almond extract or some good kirsch.
- If you love nectarines, try this Almond Dacquoise with Nectarines and Cream.


Nectarine Crumb Tart
Serves 6 - 8

Pastry Dough
1 cup (5 oz) flour
1 1/2 teaspoons (6 grams) sugar
1/8 teaspoon salt
3 oz (6 tablespoons) cold butter
1/4 cup (2 oz) very cold water

Crumb Topping
1/4 cup (1 1/4 oz) flour                         
1 tablespoon + 1 teaspoon (17 grams) granulated sugar                          
1 tablespoon + 1 teaspoon (17 grams) dark brown sugar                      
pinch salt                 
1 1/2 oz (3 tablespoons) butter, melted                         

4 nectarines
2 teaspoons lemon juice
2 tablespoons (26 grams) sugar
2 teaspoons (6 grams) cornstarch

To prepare the pastry dough, place the flour, sugar and salt in the bowl of a food processor and process to combine.  Cut the cold butter into 1/2” pieces, add to the flour mixture and process for 5 seconds.  Add the water and pulse about 15 times. The dough will not look like a smooth dough but should look lumpy like cottage cheese.  Gather the dough and place on a piece of plastic wrap.  Gently press into a flattened rectangle and wrap tightly.  Chill the dough at least 30 minutes or overnight.

For the crumb topping, combine the flour, both sugars and salt in a bowl.  Melt the butter and add.  Use a fork to stir until the mixture clumps that hold together when pressed.  Using your fingers, pinch the mixture to form bits and pieces.   Chill until ready to use.

When you’re ready to roll out the dough, remove from the refrigerator and rest on a lightly floured piece of parchment paper or work surface for a few minutes so it can soften just a bit to prevent cracking.  Roll the dough out to about a 12" square and 1/8" thickness, gently lifting and moving the dough after each roll and keeping it lightly floured as needed.  When you have the desired size, brush off any excess flour.  Fold it in half and then again in half.  Center the folded corner of the dough in a 9" square tart pan.  Unfold it and work it into the corners, leaving an overhang on all four sides.  Chill while you prepare the fruit.

Preheat oven to 400 degrees.

Cut the nectarines in slices and remove the pit.  Place the slices in a bowl and toss with the lemon juice.  Combine the sugar and cornstarch and toss with the fruit to distribute evenly.

When the oven is ready, fill the tart shell with the fruit.  Sprinkle with the crumb topping.  Fold the sides over to form a border.  Brush the border of the dough with melted butter and dust with a light sprinkle of sugar.  

Bake until the dough and topping are browned and the fruit is bubbling, about 40 – 50 minutes.  Place on a wire rack to cool.


Friday, August 9, 2013

Fig Swirl Ice Cream


In the world of ice cream and sorbet, it’s anything goes.  An industry that used to be dominated by vanilla and chocolate and a few simple permutations is now all about imagination and adventure.  I’m usually pretty game to taste an ice cream that may seem weird at first mention only to be more than pleasantly surprised by the novelty.  In fact, last night at a restaurant where the extraordinarily talented Bill Corbett is Executive Pastry Chef, I was blissfully pleased with an exquisite dessert that consisted of roasted strawberries, ricotta mousse and celery sorbet.  Absolutely intriguing and incredibly delicious!

I’m also very excited to see that homemade ice cream is becoming more popular and people are experimenting to their heart’s content.  With so many great ice cream cookbooks out now and tons of playful ingredients, it’s hard not to want to join in all the fun. 

Although there’s nothing terribly wild or weird about today’s ice cream, it’s a good one to try to take full advantage of the season.  Since figs have a unique and delicious flavor that is subtle and tends to get lost in the richness of the other ice cream ingredients, I had to find a way to concentrate their flavor.  My solution was to simmer them in port with some sugar, orange peel and spice to produce a compote that I could pair with a fairly plain but tangy ice cream base.  To preserve the full flavor and richness of the fig compote, I swirled it into the ice cream base rather then combine the two together.  It's not an overly complex ice cream but definitely a really good seasonal enjoyment for fig lovers.


Bench notes:
- Choose figs that are soft and ripe.
- The port and the sugar in the fig compote sweeten and prevent the figs from becoming too icy in the freezer.  
- If you have about a 1/4 vanilla bean piece in your vanilla sugar jar, add that to the fig compote.  Maybe even toss in a few raspberries.
- I store ice cream in airtight containers that are not tall and deep so the ice cream can come to a scoop-able temperature fairly quickly.
- This would make a great ice cream sandwich with chocolate cookies.
- I was sort of tempted to try and work a small bit of blue cheese in this or some toasted almonds or walnuts.  Maybe next time!
- I use a very simple and affordable Cuisinart ice cream machine.  You can usually find it on sale somewhere.


Fig Swirl Ice Cream
Makes about 1 1/2 pints

1 cup (8 oz) heavy cream
1 cup (8 oz) sour cream
1/2 cup (4 oz) milk
1/2 cup (3 1/2 oz) dark brown sugar, packed
1 teaspoon lemon juice, to taste
1/2 teaspoon vanilla
pinch salt, to taste

1/4 cup + 2 tablespoons (3 oz) tawny or ruby port
1/4 cup (2 oz) water
2 tablespoons (26 grams) granulated sugar
2 tablespoons (26 grams) dark brown sugar, packed
2” strip of orange peel, pith removed
1/4 cinnamon stick
6 fresh ripe figs
1 teaspoon lemon juice

For the ice cream base, whisk together all the ingredients and place in an airtight container in the refrigerator until thoroughly chilled, preferably overnight.

For the fig compote, place the port, water, both sugars, orange peel and cinnamon in a saucepan and bring to a slow boil to dissolve the sugars.  Lower heat and simmer for about 15 minutes to reduce and concentrate the flavors.  Remove the stems from the figs and cut into bite-sized pieces.  Add figs and lemon juice to the port mixture and simmer until tender, about 5 – 8 minutes.   Remove the orange peel and cinnamon stick and cool completely.

Freeze the ice cream base in an ice cream machine according to manufacturer’s instructions.  Pour a third of the ice cream into a clean airtight container.  Layer half the fig mixture on top.  Pour another third of the ice cream and then layer the remaining figs.  Pour the remaining ice cream on top and use a knife to make 2 – 3 swirls.  Press a piece of plastic wrap onto the surface, cover and place in freezer to firm up.

Friday, August 2, 2013

Honey Almond Ice Cream with Peaches


I’ve been wanting to get back to making ice cream for a while and now that I have other projects completed, I am definitely in summertime ice cream prep mode.  Since I've established a permanent home for the bowl of my ice cream machine in my freezer, it's always possible to whip up a batch on a whim.   

I’ve been reading a lot lately about the plight of beestrying not to think too much about a future without them.  What began as an anomaly in 2006 has fully evolved into what is now known as colony collapse disorder.  Even though the latest data continue to show an alarming loss of bee hives, it's difficult to grasp that they are so endangered.  Let’s hope that science continues to grapple with this serious problem and that there is more of an ongoing commitment to sustainable agriculture in our future.  Bees are an essential element of a healthy natural food system.

So my thoughts have been resting on honey and what a miraculous thing it is.  This honey ice cream is a great way to appreciate its phenomenal flavor.  And since I also had some sumptuous peaches in my fruit bowl, it seemed natural to add some almonds to the ice cream for a flavor that would be supremely complimentary to them.  But instead of just adding the sliced almonds, I coated them with a bit of sugar and spice and toasted them for even more flavor and texture.

I love the result of this easy little experiment.  The honey is delicious here and the nuts really take it to a perfect level of satisfaction.  The ice cream is definitely wonderful on its own but especially good if you have any stone fruit or berries or fresh figs.  Or just a tiny touch of chocolate sauce.  You know the drill!!


Bench notes:
- You’ll have some leftover almonds but it won’t be a liability.
- If you’d rather leave the almonds plain, be sure to toast them in a single layer in a 350 degree oven for about 6 - 8 minutes.  Watch them closely as they will burn quickly. 
- Roast the peaches and the syrup in a baking dish that is not too large so the liquid doesn’t evaporate and burn during the roasting process.  How long you roast them will depend on their ripeness.
- If you have a 1/4 vanilla bean or other small pieces in your vanilla sugar jar, add to the honey and lemon peach syrup as it simmers.


Honey Almond Ice Cream with Roasted Peaches
Makes about 1 quart

Spiced Almonds
1 cup (3 oz) sliced almonds
1 egg white (2 tablespoons)
1/4 teaspoon cinnamon
1/8 teaspoon cloves
pinch salt
1 1/2 tablespoons (20 g) sugar

Honey Ice Cream Base
2 cups (16 oz) heavy cream
1 1/2 cups (12 oz) milk
1/4 cup (2 oz) honey
1/4 cup (1 3/4 oz) sugar    
pinch salt
2 teaspoons rum
1/2 teaspoon vanilla extract
1/4 teaspoon almond extract
1/2 – 2/3 cup spiced almonds

Roasted Peaches
4 fresh ripe peaches
1/2 cup (4 oz) water
1/4 cup (2 oz) honey
2 tablespoons (26 grams) sugar
1 – 2 teaspoons fresh lemon juice, to taste

For the spiced almonds, preheat oven to 300 degrees. Prepare a baking sheet with parchment or a silpat.

Whisk the egg white until it’s frothy and opaque. Add spices and salt and whisk to combine. Toss in the sliced almonds and coat evenly. Sprinkle with sugar and toss to thoroughly coat the nuts.  Spread them on the baking sheet in a single layer.  Give them another light dusting of sugar.  Toast until they are dry and golden, about 20 – 25 minutes.  Place on a wire rack to cool completely.  Break up into small bite-sized pieces.

For the ice cream, pour the cream and milk into a saucepan and add the honey, sugar and salt.  Simmer over medium low heat until the sugar and honey are fully dissolved. Remove from heat and add the rum and the vanilla and almond extracts.  Whisk thoroughly and add a few more grains of salt, to taste.  Pour the mixture into an airtight container.  Chill thoroughly, preferably overnight.

Freeze the mixture in your ice cream maker.  Fold in about 1/2 - 1/3 cup of the spiced almonds and pour into a clean airtight container.  Press a piece of plastic wrap on the surface and cover with the lid.  Place in your freezer to firm up.

To prepare the peaches, preheat oven to 350 degrees.

Place the water, honey and sugar in a saucepan and simmer for about 5 minutes until thoroughly dissolved. Remove from heat and add the lemon juice, to taste.

Halve and pit the peaches and arrange them cut side up in a shallow baking dish small enough to fit the peach halves without too much extra room.  Pour the honey lemon syrup over the peaches and roast until tender, about 30 minutes, basting and turning them over half way through.  

Scoop the ice cream into serving bowls and garnish with the peach halves. Spoon the warm poaching liquid over the fruit and serve right away.